Quick Start Guide

Get up and running with ZUUL in minutes.
Follow these steps to set up your account, create passes, and manage guests.
Try: password, profile, recurring pass, pre-approved, import contacts

Browse all topics below or use the search above.

What are you trying to do?

Getting Started

Download the app and sign in

Set Up Your Profile

Complete your profile information

Import Contacts

Import contacts from your phone

Send a One-Time Pass

Send a one-time use pass via text

Create a Recurring Pass

Send yourself a recurring no-limit pass

Pre-Approved Guest List

Add vendors, family, and friends

ZUUL Key

Use the key feature on your dashboard

Bulk Delete Contacts

Remove many contacts at once

Fix Limited Access

Fix limited access to contacts on iOS

On this page

Getting Started with ZUUL

Getting Started with ZUUL

Getting Started with ZUUL

Getting Started with ZUUL

Welcome Email, App Download & Sign In

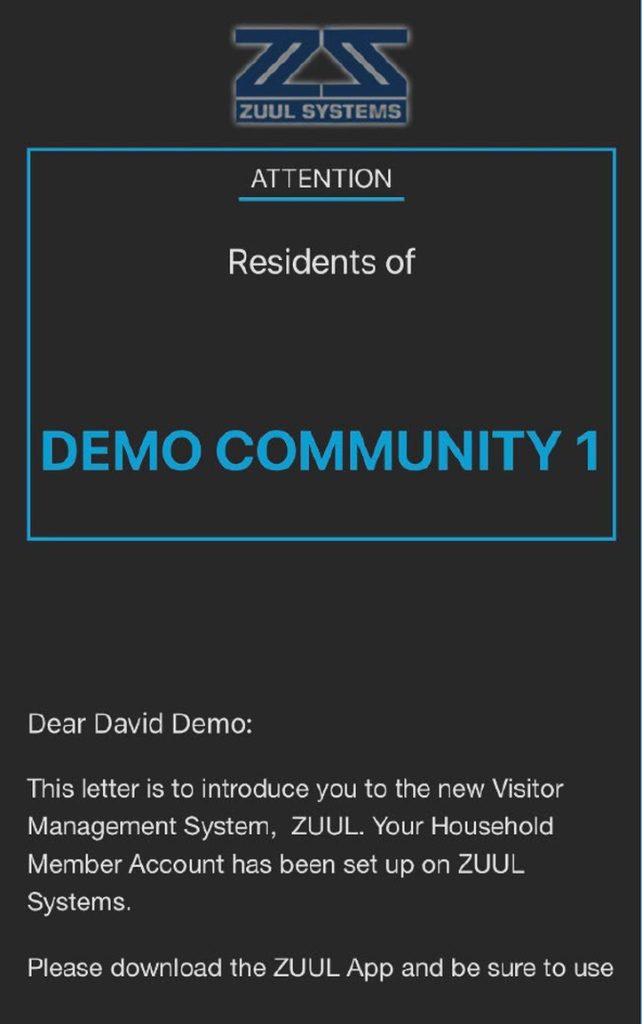
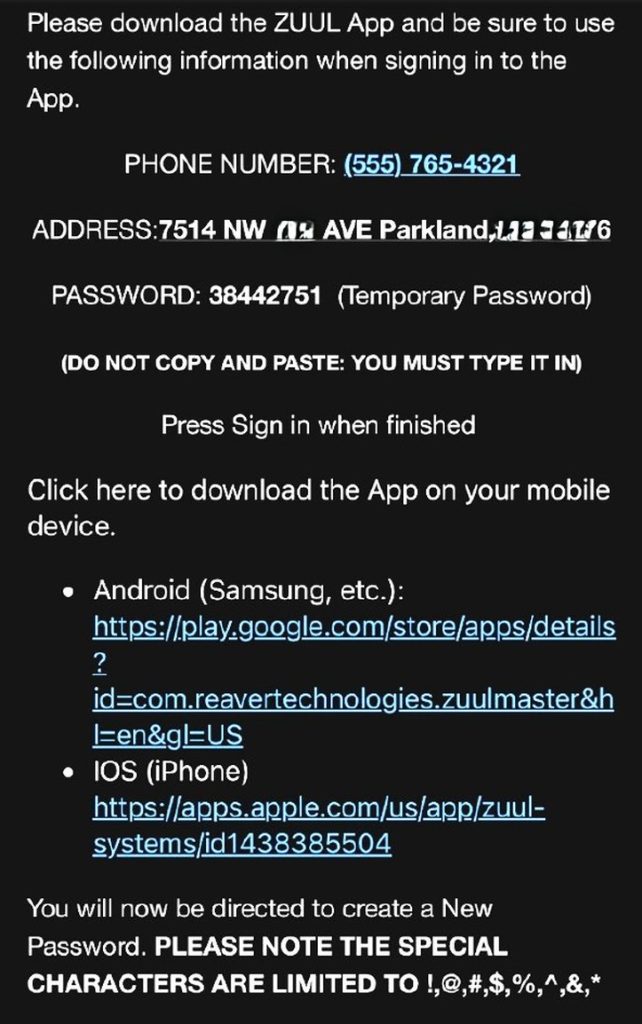
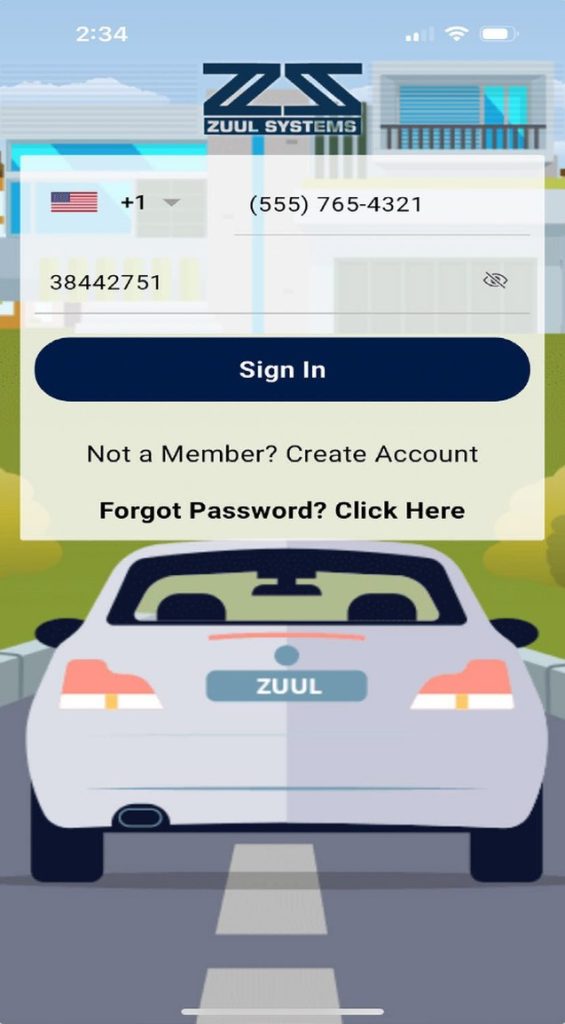
Look in your email for a Welcome email from support@zuulsystems.com. If not found in your inbox, it may have gone to your spam folder. Find your PHONE NUMBER and TEMPORARY PASSWORD, as they will be needed to create your account.

If the phone number is incorrect, STOP, and speak with your property manager.

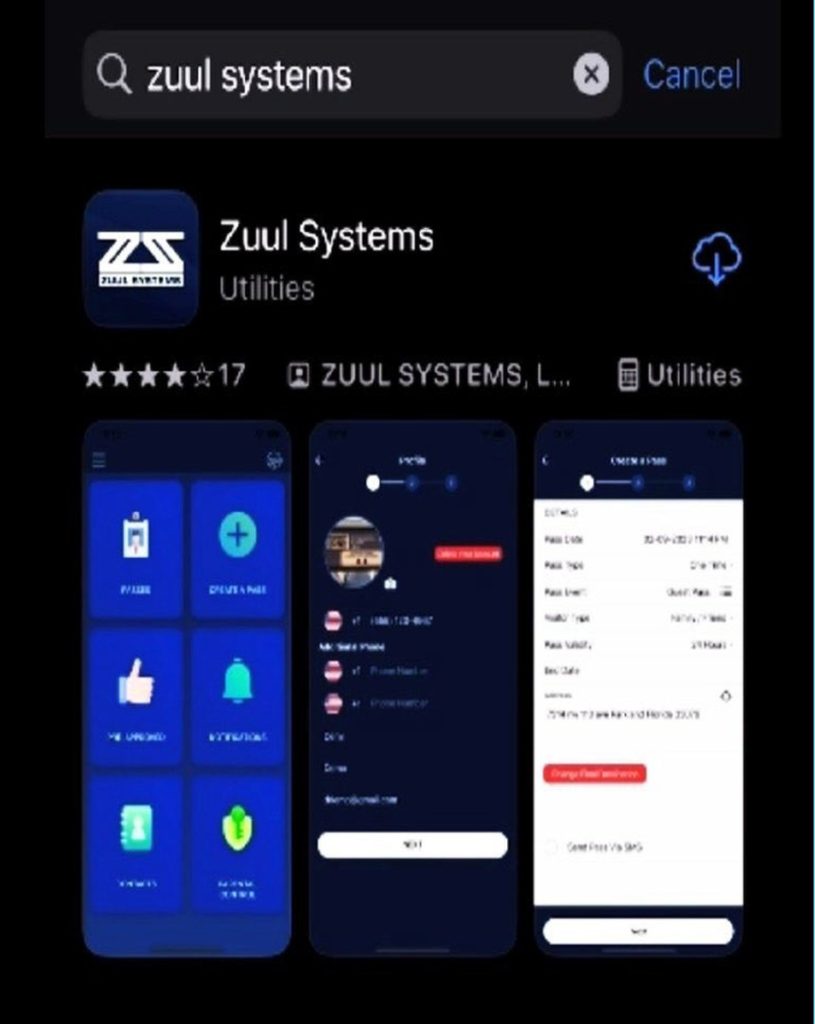
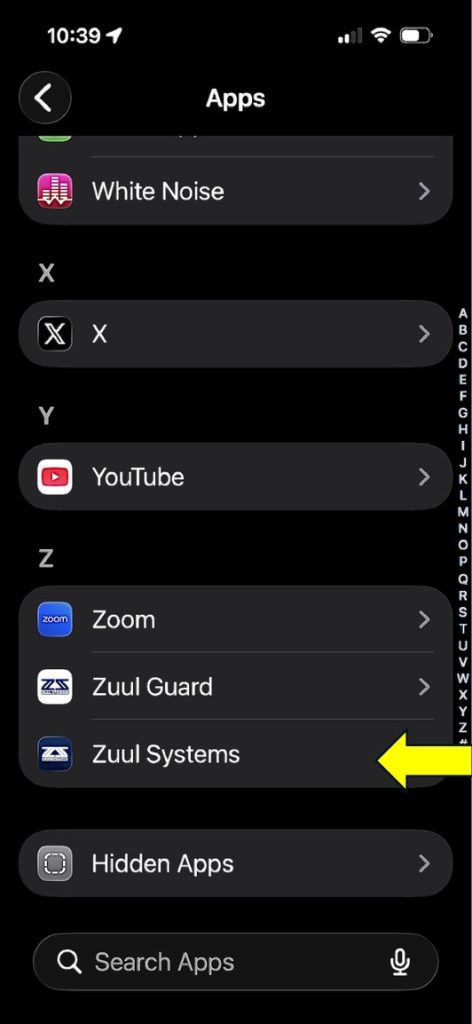
Download the ZUUL Systems app from either the App Store or Play Store. Please note, you want to download the ZUUL app that has a dark background and the ZUUL Systems logo in white.

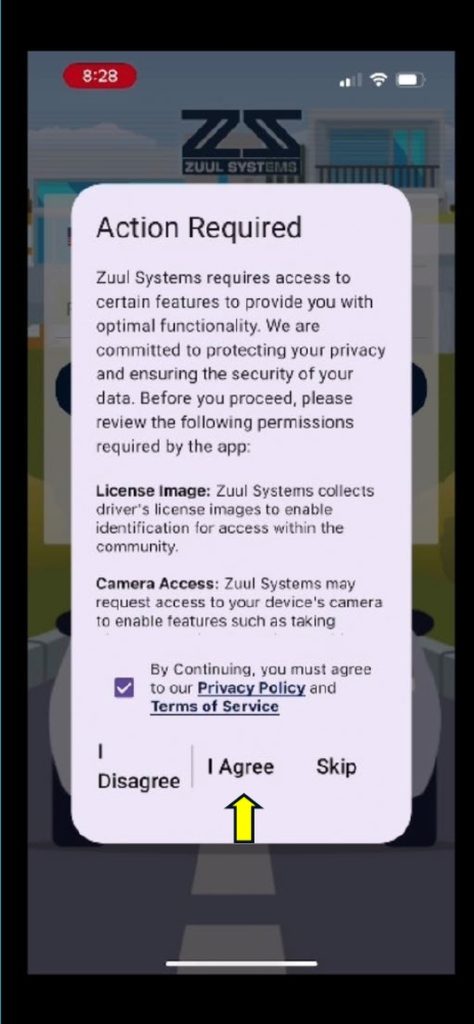
When prompted, Check the box agreeing to Privacy Policy and Terms of Service. Press “I Agree”.

At the login screen, type in the Phone Number and Temporary Password found in your Welcome email. Press “Sign In”.

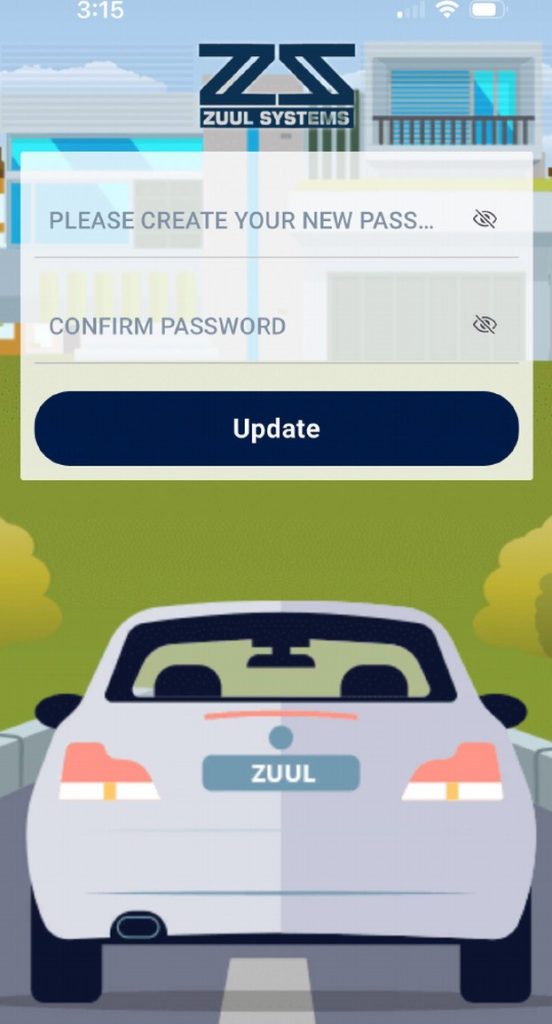
You will then be prompted to create and confirm your new password. Your new password must be at least 9 digits long, with at least 1 uppercase letter, 1 lower case letter, 1 number, and 1 special character (!,@,#,$,%,^,&,*). Press the eyes to the right to see what you typed to make sure they match. Press “Update”.

Special characters are limited to ! @ # $ % ^ & *

DO NOT COPY AND PASTE the temporary password — you must type it in.

Set Up Your Profile

Set Up Your Profile

Set Up Your Profile

Profile, Contact Info & Verification ID

Check that the information on Page 1 of your Profile is accurate. You can also add up to 2 additional phone numbers for the officers to call you at. Press “NEXT”.

On the Contact Information Page, enter the address of the unit of the community ZUUL is being used in. Press “NEXT”.

The last page of your profile requests that you upload an image of your driver’s license.

1Press “+ Upload License”
2Select “Camera” and allow access
3Take a picture of your driver’s license, and Press “Use Photo”
4Press “FINISH”. You will see that your profile has been updated. Press “CONTINUE”.

IF YOU ARE NOT COMFORTABLE UPLOADING YOUR LICENSE, TAKE A PICTURE OF ANYTHING AND PRESS "USE PHOTO".

Import Contacts from Cell Phone

Import Contacts from Cell Phone

Import Contacts from Cell Phone

Granting Access & Sharing Contacts

Go to your ZUUL Systems Dashboard and Press the “CONTACTS” Tile.
1Located in the bottom right corner, Press the “+” next to Add Contacts
2Press the “Phone Book” icon
3When asked to give ZUUL access to your Contacts, Press “CONTINUE”
4When asked how you want to share contacts, Press “SHARE ALL”

Selecting and Importing Contacts

Your contacts will be displayed in order by First Name. A checkmark will be shown next to the phone number you would import, if you select that individual.

You can scroll through your list, or you can type a name in the search bar. Press on the “circle” to the left of any name to select it for import.

If the contact has multiple phone numbers, and you want to change which will be imported, Press to the right of the number you want, and the checkmark will move. When you have completed making your selections, Press the “IMPORT SELECTED” button.

If you select many contacts at once to import, it may take up to one second per entry. Please be patient.

A confirmation of import will appear at the bottom.

If any contacts failed to import, you will see a list of which contacts didn't import and why.

Sending a One-Time Use Pass via Text

Sending a One-Time Use Pass via Text

Sending a One-Time Use Pass via Text

Send a Pass by Text Message

PRESS on the menu tab to the right of your contact. PRESS Send a Pass.

Pass type defaults to One-time. Pass validity can be 3 – 48 hours. This means that the pass can be used one-time only within the chosen time frame.

With a One-time pass we automatically give you the ability to send this pass by text message.

1PRESS Next
2PRESS Finish
3On Android devices, at the bottom of the screen, you will be required to select which messenger service you want to use
4On an iPhone, your text messenger will automatically open and populate the phone number of the recipient and a link for their QR code
5PRESS the Send button on your text messenger

Create Your Own Recurring Permanent Pass

Create Your Own Recurring Permanent Pass

Create Your Own Recurring Permanent Pass

Add Yourself as a Contact

Open your ZUUL Systems App and Press on the “CONTACTS” Tile. In the bottom right corner, Press on the “+” next to Add Contacts.

For this example, please select the middle option, “the head”, which allows you to create an entry manually. You can also import contacts by accessing the phone book on your device.

Type in your name and enter the phone number used to create your account. You do not need to enter an email; it is optional. Press “Create”.

Send a Recurring Permanent Pass & Use Your QR Code

When the page refreshes, you will see your name listed with 3 horizontal lines to the right. Press on the “3 horizontal lines” and Select the top option, “Send a Pass”.
1On line 2, Pass Type, Press on “One Time”
2Scroll to “Recurring”. Select “Recurring” and Press “OK”
3On line 5, it will now say Recurring For and defaults to 3 hours
4Press on “3 Hours” and scroll down to “Permanent”. Select “Permanent” and Press “OK”
5Scroll down to the bottom of the page, Press “Next”

6You will be notified that your pass has been sent. Press “Finish”

To use your pass, Press on the "PASSES" Tile on your dashboard, Press the "3 horizontal lines" under Permanent, and Select "Pass Details" to view your QR code.

Once scanned, that QR code is no longer valid. A new QR code will be available for use 15 minutes after the prior recurring pass QR code was scanned.

Your Pre-Approved Guest List

Your Pre-Approved Guest List

Your Pre-Approved Guest List

Adding Vendors, Deliveries, Family & Friends

Open your ZUUL Systems app and Press on the “PRE-APPROVED” Tile. In the lower right corner, Press the “+” next to Add Pre-Approved.

For Vendors and Deliveries: Type in the name of the Company; example, ABC Air Conditioning. Always leave the phone number EMPTY. Select when you want the entry to automatically be removed from your list. Press “Create”.

For Family and Friends: Type in BOTH their NAME AND CELL PHONE NUMBER. Select when you want them to drop off your list or remain permanently. The end date will automatically adjust based on your selection. Press “Create”.

Managing Your Pre-Approved List

Your Pre-Approved list shows you your guest’s name, associated phone number, and expiration date. When the phone number is left empty, the result is 111-111-1111. When processing a guest with this generic phone number, the security officer is instructed to take a picture of this guest’s driver’s license.

Press on the “3 horizontal lines” to the right of any entry to: manually remove that entry from your list, Unshare from Household (any household member that adds a guest to their pre-approved list automatically has it shared with all other household members), or Edit.

You can also add a Contact to your Pre-Approved list by going to your Contacts, Press on the “3 horizontal lines” next to their name, and Select “Add to Pre-Approved”.

ZUUL Key

ZUUL Key

ZUUL Key

Using the ZUUL Key

PRESS on the KEY in the upper right corner of your dashboard.

Note that a RED CLOCK means that you do not have access to that door at this time.

Press and hold your finger down on the door you want to open until you see the “Entrance request has been sent” message in green at the bottom.

Bulk Delete Contacts

Bulk Delete Contacts

Bulk Delete Contacts

Bulk Delete Contacts

Quickly remove many contacts at once from your ZUUL Systems contact list. The app loads the first 30 contacts in your list. You can scroll down and PRESS Load More to pull up more contacts.
1PRESS on the “+” button next to Add Contact
2PRESS on the trash can icon
3Scroll down and PRESS “Load More” to pull up more contacts
4Choose each contact individually, or choose “Select All”
5PRESS the “DELETE SELECTED” button
6PRESS “Delete” to confirm

Fixing Limited Access to Contacts

Fixing Limited Access to Contacts

Fixing Limited Access to Contacts

Fixing Limited Access to Contacts

If ZUUL only has limited access to your phone contacts, follow these steps to grant full access so that contact import works correctly.
1PRESS SETTINGS ICON
2SELECT APPS
3SELECT ZUUL SYSTEMS
4SELECT CONTACTS
5PRESS ON FULL ACCESS
6PRESS ALLOW FULL ACCESS
7RE-OPEN ZUUL APP

8Import contacts from phone book

Still stuck?

We’ll help you get it sorted. Our support team is available to assist you.

Include screenshots and your community name for faster assistance.